Do you want to seo your blog in blogger but because you are doing seo in blogger for the first time then you are facing problems then do not panic because in this article we are going to tell you that you can seo blog in blogger To know how you can do this, read the article till the end.
Also Read: Best Ways To Earn Money From Article Writing
How to do seo in blogger
blogger seo kaise kare This work starts with creating our blog, when we create our blog, we put title, tag, meta description etc. according to the topic of our blog in blogger’s settings.
And then create a sitemap of our blog and submit it to Google search console and after completing all these work, we create a page on our blog and then start writing posts on our new blog.
So here we will know the process of SEO which starts with creating our blog and the complete process of SEO till writing the blog post.
Blog Title
Now here the title of your blog will appear at the top, when you create your blog, then only you create this title and the same will appear here if you want to change it, you can change it by clicking on it.
how to write blogger description
Below the title, you will have to enter the description of your blog, as you click on the description, a pop-up will come in front of you, now here you will write your blog description within 500 words.
In the description, you will write things related to your blog, that is, what is the topic of your blog, what kind of content do you want to put on your blog, keep in mind that the keywords related to your blog should be mentioned in this description.
For example, if your blog is related to blogging, then you can mention the following keywords in the description blog, blogging, blog seo, earn money from blogging etc.
But you do not have to write these keywords directly, rather you will write about your blog and the topic of the blog in your description and in between you will be mentioning these keywords in between.
Blog Language
We have to choose the blog language below the description, for this, by clicking on the blog language, you will choose the language of your blog, in which language you want to write the article on your blog, you will click on save below, and Now we see below the further settings of how to do seo in blogger.
Google Analytics Property ID
We have to connect our new blog to Google Analytics, although it does not make any difference in SEO, but through this we are able to see the performance of our blog and by working accordingly, we can move our blog forward.
You will click on top of google analytics and click on save below enter your analytic id here if you don’t know how to create google analytics account here is a guide.
Blog Favicon
There is an option of Favicon under Google analytics, you will click on it and you can upload the logo you created for your blog here by clicking on the choose file.
When a person searches a keyword in the search engine and your posts appear there, then this Favicon appears in the search engine before the same post title.
Blog Privacy
Under the favicon, you will get the option of privacy by clicking on the small button on its right side, only then Google will rank your blog in the search engine.
If you do not turn on this privacy button, then it means that you are telling google that they should not show this blog of yours in the search engine, so you have to turn it on.
Publishing
There is an option of publishing under the privacy, if you are using the blogger’s domain i.e. blogsport.com in your blogger, then there is no need to tease this option.
And if you want to add a custom domain to your blogger by buying it, then you will be able to add that domain through this option.
Blog HTTPS
The option of HTTPS will be found below publishing, this is for the security of our blog, although it is on by default in blogger but if it is not on, then turn it on by clicking on both the buttons in front of https availability and https redirect.
Permissions
Permissions option will be available under https, this option is for those who make someone else an admin in their blog or have a content writer and give them access to write posts on this blog.
If you also want to give the admin of this blog or content writer access to post here other than yourself, then you can set through this settings.
Blog Post
You will get the option of post below the permissions, here you can set the maximum post show on the main page by clicking on the top of the main page below that you want to show the maximum number of posts in your blog home page.
That is, when someone goes to the home page on your blog, to see how many posts there, you will click on the Max post show on the main page and then put the number, we suggest that you only have 5 to 7 posts at most. Show on home page.
Now at the bottom you will get the next option of image lightbox and by clicking on the button in front of it, you have to turn it on, the advantage of turning it on will be that when someone comes to your post and clicks on any image, then he The image will open and appear on the skin.
If you will not turn on this button and someone clicks on any image in your post, it will open in the URL of the image, then when that person clicks on the back button, then he will be able to come back to the post.
You will get the option of Comment Location at the bottom of the post, this option is for you to optimize the comment section in your blog post.
When you click above the comment location a popup will appear and it will have four options embedded, full page, popup window, hide in which embedded is selected by default.
After choosing any one of these four options according to you, you will click on save below.
If you choose embedded, then when someone goes to comment on your blog post, then after going to the last of all the comments, they will get the option to comment.
And when you select full page, then a person will go to comment on your post, then to comment, he will click on post a comment and then a new window will open and then he will be able to comment on that new window.
And if you choose the third option i.e. popup window, then as someone clicks on the post a comment to comment on your post, a pop-up will open in front of him and he will be able to comment in that.
And if you choose hide the fourth option, then the comment section in your post will not be visible to anyone i.e. no one will be able to comment in your post.
Now you have to choose here which of these four features you want to use. After the comment location, the next option is who can comment, you will click on it.
On clicking, a popup will appear in front of you and there will be three options in it, anyone, user with google account, only members for this blog By default in these three options, anyone is selected.
Being selected on anyone means that anyone will be able to comment on your post, in this if you choose the second option users with Google account, then only people who will have Google account will be able to comment in your post.
And if you choose the third option only members of this blog, then only those people who have subscribed to your blog will be able to comment.
In this, we will suggest you to select users with Google account, you will click on whichever of these three you want to select, tick mark it and then click on save below.
In the comment option, we have understood the option of comment location and who can comment, now we will understand the third option comment moderation in this, for this we will click on it.
On clicking above comment moderation, a pop up will come and there will be three options in it always, sometimes, never you will choose any one of these and click on save below.
If you choose always then any comment comes in your post then you will approve it only then that comment will be live If you comment again, then it will automatically go live.
And if you select the third option never, then the comment will not stay with you for moderation, any comment will go live immediately and then we will suggest you to choose always in it.
Because many times people put spam comments in our posts, then if you have selected always then that comment will come to you first and you will be able to delete it before it goes live after checking it.
Now the next option is for email moderation request, you will click on it and put an email id and click on save, then it will be beneficial that if any comment comes to your site, then its information will be found on this email.
And its next option is reader comment captcha, it is on by default, leave it on and then its next option is comment from message.
Type a message by clicking above the comment from message, that message when someone goes to comment on your post, then he will see that message below the comment box.
For example you can type this message “Please do not put any links in comments” and then click on save below to save.
Blog Meta Tags
We have understood all the options in the comments, now we will understand the option of meta tax below, enable it by clicking above the button in front of the enable search description below the meta tags.
After enabling, you can write a description of up to 150 words here by clicking on the search description below it.
When we enable by clicking on the button in front of enable search description and write any post on our blog, then we also get the option to write description in that post on the right side.
Also Read: Complete Information On How To Earn Money From Pubg Game
Crawlers and indexing
After meta tags, we get the option of crawlers and indexing, you enable it by clicking above the button in front of enable custom robots.txt and then after pasting the sitemap of your blog by clicking above custom robots.txt below save it Click above.
Now you must be thinking that what is this sitemap, where to get it and paste it here, then here is a guide for it. Blogger Sitemap Kaise Banaye This post describes how to generate sitemap for both WordPress and Blogger.
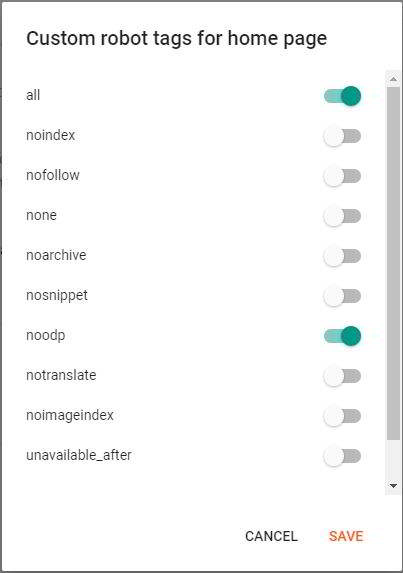
Now enable it by clicking above the button in front of the enable custom robots header tags below and then clicking on the home page tags below it, a popup will appear in front of you, this popup will have many options in which all and noodp have to be turned on And click on save below (see picture below)
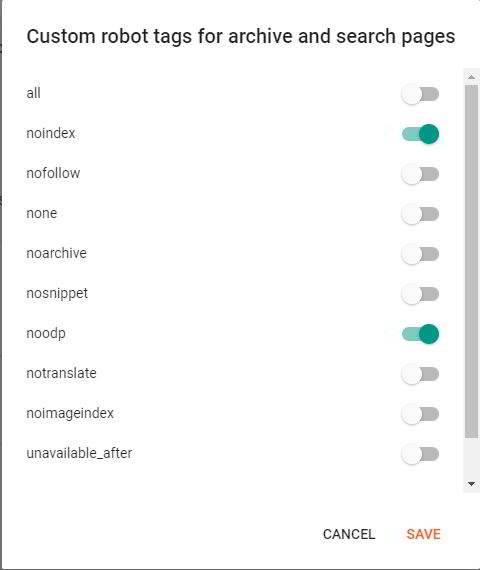
After home page tags, you have to click on archive and search page tags below, again a popup will come, now you have to click on save the second number noindex from the top and the seventh number from above by turning on noodp. (see picture below)
Now the next option is to click on the post and page tags and save the first option from above, then turn on the seventh option noodp from above and click on save below.
Now the next option is Google search console, as you click on it, a new tab will open in front of you and here you will verify it in Google search console by entering the URL of your blog.
If you don’t know the process to verify your blog in google search console then here is a guide. Blog Ko Google Par Kaise Laye
Whatever we have enabled and disabled in the settings of our blog above, they all play an important role in the SEO of our blog.
So we learned this blogger seo kaise kare here, now we need to write a seo-friendly post on our blog, so we have written a complete article on this topic too, you read this post and learn to write a quality article.
last word
In this article, we learned how you can SEO your blog in Blogger, although its process is quite easy, if you are using Blogger for the first time, then you may have to face its problems, as told by us. By following the steps you will be able to do it easily but if you have any questions related to this then you must ask in the comment section.
Read More:-
Post a Comment